Lesson Objective — Students will learn to identify and describe soil horizons found in the soil in their locale. Students will construct a scale model of the horizons found in their soil pit.
Subject Area — Soil Science
Grade Level — Grade 7 through 12 Alaska Science Standard SD2.1
Season to be Best Complete Lesson — Fall or very Late Spring. It is best if there is no snow on the ground.
Time to Complete Lesson — It will take a half an hour of introductory time in the classroom and about 45 minutes outside the classroom to acquire the soil samples. Making the profile cards in the classroom takes about an hour. Depending on the school schedule, it could take 2 or 3 class periods to complete the activity.
Materials Needed
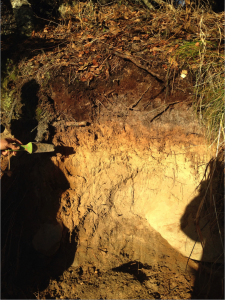
- Soil Profile Pit dug to about 5 feet deep. It works best when the soil pit is like a road cut on a hillside so many students can access it at once. See attached picture.
- Shovels
- 5 small Envelopes Per Group
- Yardsticks
- Writing Implements
- Scotch Tape — 12 inches per group
- Soil Profile Cards — premade by teacher or accessed from the USDA link.https://www.nrcs.usda.gov/wps/portal/nrcs/detail/soils/edu/?cid=nrcs142p2_054308
- Index Cards — 2 per group
Procedure
Students will be taught basic information about the soil profiles in the classroom before they go outdoors.
- First students will briefly learn about CLORPT. This acronym stands for the six ways soil is formed.
- Cl – Climate
- O – Organisms
- R – Relief
- P – Parent Material
- T – Time
- Next students will learn briefly about the standard soil horizons one encounters in soil. They will also realize that not all soil follows this exact pattern.
- O – Organic
- A — Organic Matter and Minerals
- B – Minerals
- C — Parent Material
- R — Bedrock
Once students have a familiarity of what will be seen when they go outdoors, they will go out to the soil pit, dressing appropriately. Students will be working in pairs. Each group should have 5 envelopes, an outdoor writing utensil and a yardstick.
- Starting from the top of highest point on the soil pit the students will:
- Identify the top layer, labeling the envelope 1
- Measure the thickness of the layer in centimeters recording that amount on the envelope.
- Describe the top layer — silty, sandy etc., writing it on the envelope
- Describe the color of the layer, writing it on the envelope.
- Students will hypothesize how this layer of soil was formed.
- Take a Tablespoon sample of the soil and put it in the envelope.
- Repeat the process for the next four layers. A sample chart to fill out about each layer is at the end of the lesson.
Return to the classroom to complete the final steps or finish the last part on a separate class day.
- Students work with their partner and their envelopes to develop a mini soil profile.
- First the students will add up the centimeters in their 5 layers.
- Then the figure out percentage each layer is of the overall sample, filling in the chart with this information.
- Next have students make a roll of tape as long as the mini soil profile on the card and stick it onto the profile. When they are done, a sticky face will be sticking up and the tape will be adhered to the mini profile card.
- Using the scale provided, students will put an index card at 0 and the other one at the depth of the first layer, covering up all the tape but the tape that spans this area. Students will sprinkle some dirt from envelope number 1 on the part of the tape, being careful not to get it on other parts of the tape. They also will transcribe the information from their envelope to the chart on the paper.
- Gently remove the index cards, moving them down to the next layer. The top card will cover the tape above the second layer and the bottom card will cover the tape below the second layer. Sprinkle the soil and transcribe the information.
- Repeat until the profile is done.
Lesson Extensions
Students can retain their five sample envelopes and investigate the meaning of the color of the soil. The Munsell Soil Color Chart is to the tool to utilize. Alaska Science Standard SD2.1 Here is a useful link. https://www.nrcs.usda.gov/wps/portal/nrcs/detail/soils/edu/?cid=nrcs142p2_054286
If enough soil is collected, the students can use the samples to investigate soil texture by feel techniques. Alaska Science Standard SD2.1 Here is a link to a chart to use. https://www.nrcs.usda.gov/wps/portal/nrcs/detail/soils/edu/?cid=nrcs142p2_054311
Bibliography
UKN. “Natural Resources Conservation Service.” A Soil Profile. USDA, n.d. Web. 11 July 2016. <https://www.nrcs.usda.gov/wps/portal/nrcs/detail/soils/edu/?cid=nrcs142p2_054308>.
Harpstead, M. I., T. J. Saues, and W. F. Bennett. Soil Science Simplified. Ames: Iowa State UP, 2004. Print.
Sample Chart – This chart can be used when students are outdoors gathering data.
| Layer Number | Percent of Total Profile | Length in Centimeters | Soil Description | Soil Color | Hypothesis on Soil Formation |
| 1 | |||||
| 2 | |||||
| 3 | |||||
| 4 | |||||
| 5 |