I ran across yacon in 2014 in a column by Jeff Lowenfels. He recommended it as a handsome plant that produces sweet tubers at the end of the growing season. We decided to give it a try one year and have done it every year since.
The plant itself goes by several names: yacon, Bolivian sunroot, Peruvian ground apple and occasionally “yacon strawberry.’ The plant itself is related to sunflowers, dahlias, Jerusalem artichokes and other similar plants.
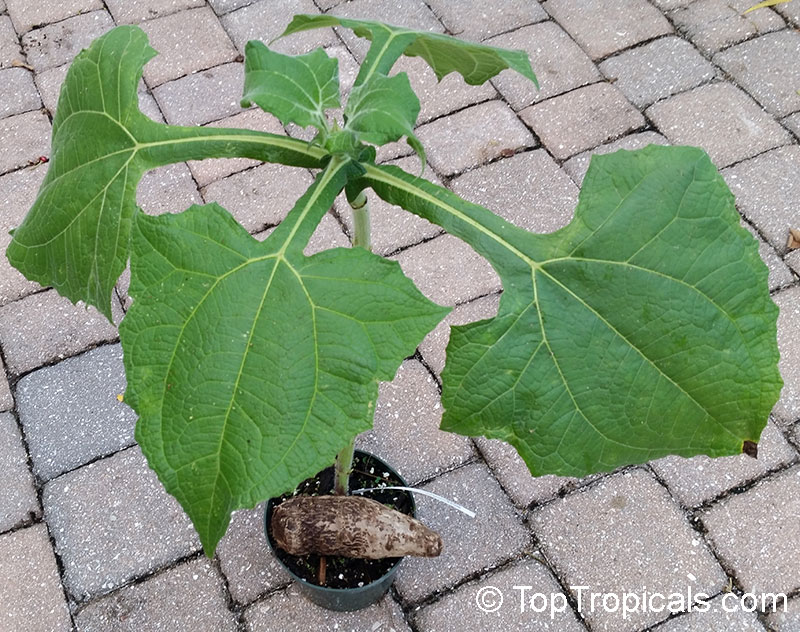
It generally looks similar to a sunflower and grows up to 7 -8 ‘ tall in parts of the Lower 48, sadly only 3’ or so in the winds of south Anchorage. I have never seen a flower, though they look like small sunflowers and are present 5 — 9 months after planting, which is probably why I have never seen them.
The plant produces a cluster of storage roots, with the cluster being just under a foot across. These roots are layered, with smaller purple rhizomes which produce next year’s plants on the top layer, and the tubers to be harvested at the bottom. The edible part of the plant is technically called either a storage or a tuberous root.
The flavor of the yacon tuber and its sugars are the magic of this plant. They are variously described as a mixture of tastes like apple, pear or celery. If you don’t wait until the first hard frost to harvest it, the sugars will be significantly muted (I know, as I’ve sadly tried this).
The texture of the tuber is very close to a wet, sweet water chestnut. Some people recommend peeling the skin off the roots before eating and storage. I’ve had good luck simply scrubbing them with a hard brush like I do before storing potatoes.
Best of all, yacon grows pretty easily and is forgiving of most insults. In windy locales, it tends to be shorter. In calm locales, it tends to be taller, though may require staking if not in relatively shielded parts of the garden. It is also ‘solar-powered’, and much more productive in a warm summer than a cold one. Yacon is native to the high Andes, so it is tolerant to cold, windy and dry conditions, though like all plants, if you starve it of water, you limit the growth of the water storage tubers harvested in the end of the season.
Its leaves are generally green, a bit darker toward the leaf stalk, with a velvety texture on top, and can get quite large. Bloggers in the Lower 48 report leaves up to a foot across. I have only seen 8′ here. Each rhizome produces a single stalk, so it is not uncommon to have several stalks from a single group of rhizomes.
Nutrition
One of the interesting things about yacon is that its tubers are largely water, high in fiber and most importantly contain a sugar that is not digestible by humans. In other words, it tastes sweet but does not carry any sort of a carb load. It is not particularly rich in vitamins or minerals outside fiber and potassium. The bad news for all this that yacon tuber is reported in various places as a somewhat gassy vegetable, not unlike Jerusalem artichoke. I have not personally noticed this ‘gift’.
Yacon is most often eaten raw, peeled and eaten. A couple writers have mentioned the tuber skin tending toward bitterness after extended storage, though I have not seen that yet either.
Sourcing
Lowenfels’ 2014 column on yacon said he was able to get it from Nichols Garden Nursery. I ordered it successfully from them for a few years. Unfortunately, their supply is limited, so you have to order early. This also means they ship early, and you have to figure out what to do with what you ordered for at least a couple months before you can move them outdoors. Last year, Nichols did not carry yacon, so I had to find them from other online vendors who will ship to Alaska.
Over the years, I have had to find other vendors for yacon. Some take better care of what they ship than others, so be warned. On the other hand, if you figure out how to care for your rhizomes from last year’s crop, you won’t need newer plants. I have not been that successful yet.
The following video is courtesy Daleys Fruit Tree Nursery, Australia, 2012
Growing
Generally, yacon ordered from Outside nurseries arrives in 4′ pots as individual rhizomes with leaves and a stalk already above ground. Lowenfels recommended treating them like dahlias. Grow them indoors. Transplant up if necessary, using well-drained compost. And harden them off a week before planting outdoors. Here in South Anchorage, where we have winds, that is generally around Memorial Day. They can then be transplanted into your garden, raised beds or containers. I have done all three, though I tend to prefer my raised beds which has better dirt.
When planting in beds, keep them at least 2’ apart. When planting in pots or containers, keep those as large as possible, at least 2’ deep and 18′ wide. The roots like lots of room and are easily root bound.
I have not had a significant problem with pests, though whitefly seems to like yacon. Insecticidal soap seems to handle the whitefly reasonably well, though you need to keep on it once they are present.
Harvesting
I generally wait until the first killing frost, which is the first frost that shrivels the leaves of the plant, to harvest. It is easy to see when the previously vigorous leaf system is shriveled and drooping.
At that time, if the yacon is in a bed or in the ground, I get a spading fork and dig at least a foot away from the stalks. Then I work around the plant, trying to pull up the entire root and tuber system as a single root ball. You have to be careful, as the storage tubers are relatively easy to break, leaving part of them in the hole. Shake off the remaining dirt, cut stalks off, and move the cluster of tubers to where you want to process them. Depending on the soil, you might have to wash the soil off the cluster.
Most of the blogs that discuss harvesting yacon suggest allowing the cluster to rest for up to a week. I have had best results processing it the same day I harvest it.
Remove the storage tubers from the ball working outside in. Leave a few storage tubers next to the upper layer of rhizomes to provide sustenance for their survival during storage.
One fall, I left the harvested tubers in the garage like potatoes to dry. And dry they did, shriveling to irrelevance, meaning I lost most of that year’s crop.
Once I have the tubers processed, I scrub the tubers, pat them dry, put them into a gallon Ziploc freezer bag and pop them into the vegetables storage section of my refrigerator. I have kept them for over 60 days with minimal loss, though the exterior tends to get a bit slimy toward the end of that time. I am still eating yacon tubers harvested in September this year.
Storing for Replanting
Yacon reproduces via rhizomes, typically a layer of small purplish nodules just below the crown of the plant. We have found it to be a good idea to leave a few tubers connected to the root mass so these can have something to feed off while in storage. Sometimes these are so closely packed that you have no choice but to leave them alone.
I put whatever I intend on trying to keep through the winter in a 5-gallon bucket filled with slightly moist mulch. Sawdust or dirt will also work. We use mulch because it gets used for starts in the spring as the compost pile remains frozen well into May. Fill the bucket 2/3 of the way full. Place the mass of corms and remaining tubers on top and cover to the top of the bucket. We lightly set the lid on the bucket and do not snap it down, leaving it loose. We then put the bucket in the crawlspace and hope for the best. This is normally done within a week of harvest after first hard frost.
My problem is that I have not yet figured out how to store the plant over the length of an entire Alaskan winter (Sept – April), as my experience has been that the rhizomes will only last about 6 months in storage before wanting to grow. If harvested in September, this will only take you into February. I get into the crawlspace in mid-March and find most of the rhizomes have sprouted, pushing the lids off the storage buckets in search of light to grow. The stalks are pale, smell of yacon, and are occasionally as long as 3’. I snip them back near the rhizome and see what I have left to plant.
Surviving rhizomes are readily identifiable. Those used up are shriveled and dry. They will not grow again.
Next Spring
If you choose to start in February and grow these inside, be sure to use a grow light and have lots of soil available. We have been growing these successfully in compost and they seem to tolerate compost-only planting well, though those in the raised beds seem to do better, probably due to actual soil.
I pulled the rhizomes from the crawlspace in February the first winter after we tried to grow them. This turned out to be a mistake, as we did not have grow lights at the time. The stalks grew like crazy, well over 4’ high. They did not get either robust or strong. We had to stake them up and cage them much like tomatoes. This was difficult, as the tall, slender stalks are hollow, fragile and broke very easily. By the time we tried to transplant them outside in early June (after a week of hardening), we had lost perhaps a third of them to breakage. We suspect that grow lights would have helped keep them short and encourage leaf growth but have not experimented with that yet.
We transplanted the first batch into the raised beds and the first big wind broke all the rest of them. This did not kill them completely, though what finally produced tubers in September were smaller and less productive than normal. Clearly, I can do this better.
Lessons Learned and Conclusions
Positive lessons:
- Yacon is tolerant of a range of soil conditions, though prefers soil to pure compost
- Yacon seems to be tolerant of pests
- Yacon produces handsome leaves and nice, edible tubers
Negatives and unknowns:
- We still haven’t figured out how to store rhizomes longer than 6 months
- Inside growing of rhizomes requires grow lights and vertical space above
If we can solve the problem of rhizome storage and early growth, and we can eventually treat these like we do dahlias.
Overall, this has been a fun journey and I highly recommend it. Cheers –
Additional information
https://www.gardeningknowhow.com/edible/herbs/yacon/yacon-plant-care.htm
https://www.permaculture.co.uk/How-to-grow-harvest-eat-yacon
https://www.cultivariable.com/instructions/andean-roots-tubers/how-to-grow-yacon/
https://greenharvest.com.au/Plants/Information/Yacon.html
https://www.attainable-sustainable.net/growing-yacon/
https://www.thompson-morgan.com/how-to-grow-yacon
About Alex Gimarc
Twitter •
Thanks for the growing tips! Where are you sourcing your yacon this year? I am hoping to buy a start this year, but have been trouble finding a source.
I have stored the rhizomes successfully over the past two years. I have just potted 10 large clumps and most have many spouts several inches high. I will sell some pots and plant the rest in the ground the last of May. I store them like I do my dahlias.
I dig the whole Yucon plants up in Sept. Timing is usually based on trips planned and not necessarily after frost has killed the stocks which I would prefer. I harvest the big tubers and bring the clumps into the garage and let the soil dry for a few days. I knock the loose soil off then store the clumps on top of each other in a heavy cardboard box with an extra piece of cardboard on top to stop light penetration. I store the box in the garage in a cool and out of the way place in the heated garage. I opened the box in January and mid March and poured a little water on the clumps. Later in March I opened the box and pulled the clumps out, placed them in a single layer in cherry tomato/peppers boxes from Costco and watered them. I planted the clumps in large pots two weeks ago and watered thoroughly.