One of the science projects I’ve managed to get myself into is vermiculture. Using a Worm Factory 360 in my heated garage, my worms manufacture compost throughout the winter for my spring starts. It has nothing to do with wanting to recycle, for environmental reasons. Rather, I simply do it to have enough compost / mulch in the house to for starts in the spring. Like I said, an experiment.
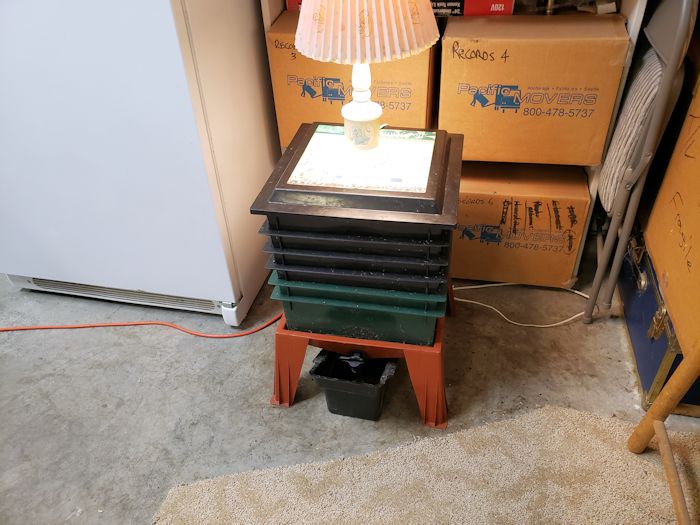
After a little bit of research, I decided that the Worm Factory 360, a rotating set of trays, would suit my needs. The basic unit comes with four stackable trays, stand, lid, catch-basin for worm tea, instructions, and a set of consumable materials to make bedding (rock dust, granulated pumice, coir). Worms, specifically red wrigglers, must be purchased separately either locally or on the Internet. But if you order on the Internet, you have to be a little careful of the cold if they come from Amazon during the cold part of the year.
I ended up with a 6-tray unit, which may be about the maximum you want to stack, as you have to lift the entire stack to rotate trays. The manufacturer says a full tray is 12.5#, so a full 4-tray unit will be 50# and a 6-tray stack will be 75#. And that stack gets very heavy to move to harvest compost from the bottom. The other weightlifting exercise is detaching the bottom tray containing the compost you will harvest from the other trays above.
I initially put 2,000 worms in the first tray and didn’t have to add any more until a little disaster last summer. More on that later.
What follows is a description of what I do. It is not the only way to do this. It is not even the best way. Rather it is a description of what I am doing and why. Read the instructions that come with the unit, as they answer most initial questions and are a great place to start.
Observations
Over the course of a winter, Oct — May, I harvest more than 20 gallons of high-quality compost, more than enough for spring starts.
The bin is relatively odor-free. The odor you do get is relatively pleasant and a bit earthy. If you smell anything else, particularly an unpleasant smell, this is an early indication of a brewing problem.
Harvested compost still cooks a bit, so the lid on whatever you store the harvested dirt in should be loose enough to allow a bit of airflow.
Where worms go in the bin seems to be temperature dependent. We keep our heated garage around 53 — 55 F. It heats up to the mid-70s F at the height of a very warm summer. During the colder parts of the year, worms tend to migrate toward the top of the stack. During the very warm parts of the year, they tend to be much more widely distributed throughout the stack. This makes harvesting the compost in the summer much more time consuming as you have to separate the worms from the compost and toss them back into the open top tray of the bin.
For the bedding, I tried shredded egg cartons for a while and found they were not being consumed so I switched to shredded paper and got better results. You may also want to purchase some additional bedding such as coir, mineral dust and pumice.
This sort of unit is a rotating tray operation. New food is always added to the top. You should never have to unstack the trays until you remove the bottom one for harvesting. Worms work their way up the stack for the new food.
The worms will manage their numbers by themselves. If there is a lot of food, you will have a lot of worms. If not, their numbers will decrease accordingly. The recommended feeding / harvest cycle is 4 — 6 weeks. If you are going to be out of town for a while, feed them a little more before you go. Be sure not to pack it into the tray.
The worms will climb out of the unit from time to time and go on walkabout. They tend to avoid light, so I keep a low power baby room light on top of the lid just to discourage this sort of trip. It’s not uncommon to see one or two outside the stack over the course of a week. More than that, and you may have a problem.
Food
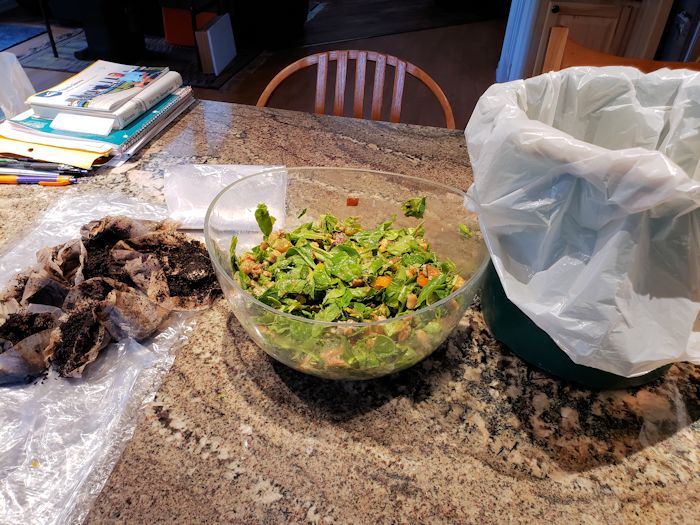
The worms compost a mixture of fruit, veggies, or bread and this is sometimes referred to as food. The instructions recommend a 1:1 mix between shredded paper and the fruit, veggies and breads. I add a little less paper and more food as the paper tends to dry out.
There is a short list of things not to put in the bin. This includes dairy, eggs (though crushed eggshells are ok), chips, meats, onions and garlic. The manufacturer recommends you minimize citrus, so we don’t put any in at all.
I spend perhaps an hour a week preparing the food. We store scraps over the course of the week, with breads in one bag and fruit / veggies in another. At the end of the week, I cut up the scraps aiming for chunks less than a ½’ cube. We hope to accumulate a gallon of food. Then I mix it in a 2-gallon bucket, lined with a trash bag and add it to about one gallon of shredded paper. Finally, I add coffee ground and filters and then eggshells. Disposable are nice to use when mixing the food and bedding.
One thing to keep an eye on is not to make the mix either too dry or too wet. Things generally work out better if the mix is a little on the wet side.
Feeding the worms
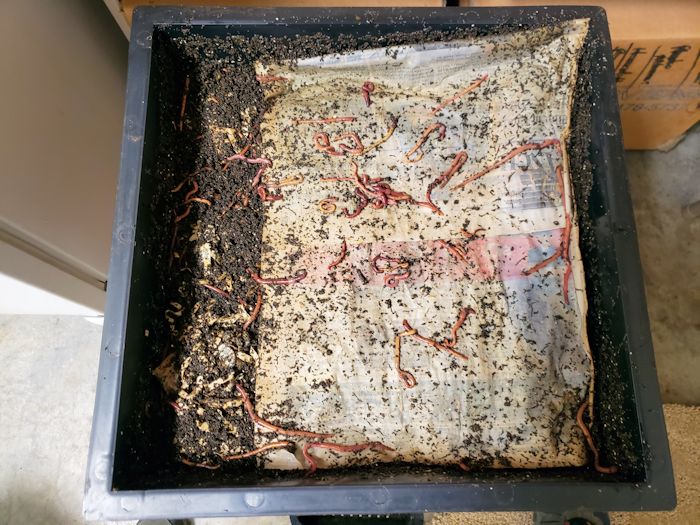
When you uncover the stack, on the underside of the lid, there are generally a few worms out on walkabout. They need to be brushed into the bin.
I put wet newspaper on top of the bin each time I feed the worms. This is called a moist newspaper cover. Instructions recommend 5 — 10 pages. I use 16. Be sure to brush the worms off these papers back into the tray. You might have to remove the outside page to get them all as worms will burrow between the outside piece of paper.
When you remove the paper, you should see worms either on the bedding or around the edges of the tray. Next, add your food. The instructions recommend banking what you add, working from one side of the tray to the other rather than adding a thin layer across the entire area of the tray. Fill the tray to within about an inch from the top of the tray. Do not compress the food.
Then you need to wet down another set of newspaper pages and fold it to cover part of the newly fed tray. I generally need two of these to cover an entire tray. Next, replace the lid and you are ready to go. I usually rinse the lid before replacing it on the stack.
I feed the worms weekly and generally do it 4 times before I harvest the compost. In my stack, this means that compost spends around 6 months in the unit.
Harvesting the compost
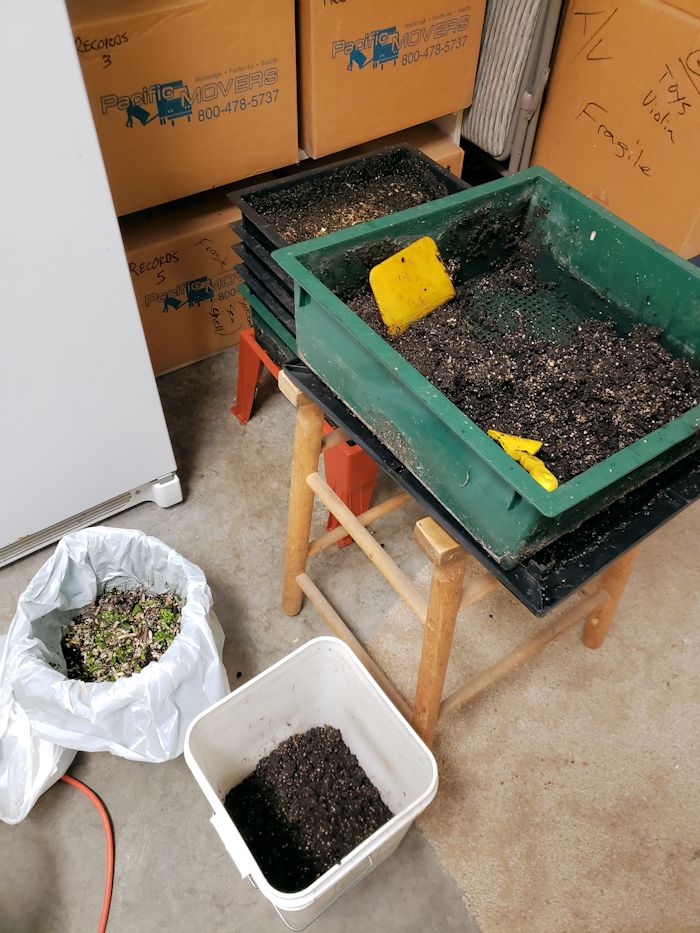
When it comes time to harvest the compost, follow the same steps as you would when you feed the worms but also remove the stack from the base. You may have to twist it a time or two to detach the worm ladder inside the base. Then set the stack on top of the lid (place the outside of the lid on the bottom).
At this point, harvest what little bit of compost that has made its way into the base. Return what worms you find in the base back to the top tray. Rinse the base and the catch basin for worm tea. This stuff can be used as it makes great organic fertilizer. Be careful as it is concentrated and must be diluted.
Then, detach the bottom tray from the rest of the stack and return the rest of the stack to the base. You will harvest compost out of this tray. The kit comes with a plastic scraper and fork. Use this to start harvesting the compost. You will have to separate the embedded worms from the rest of the compost. They tend to hang around in corners. This is more painful in the summer when they are well distributed throughout the stack than in the rest of the year when they are concentrated more toward the top.
I return the worms I find to the top bin of the stack.
Scrape the rest of the compost off the outside of the empty tray and place it on top of the stack.

Bedding
The next project is preparing bedding for the new tray. This is a mix of coir, mineral rock dust, and pumice. I also use equal parts wet shredded leaves from last fall and a couple scoops of Alaska Humus as starter. The worms seem to like this a lot. Total volume for this is generally about a gallon.
Once mixed, I spread the bedding across the bottom of the empty tray and add this week’s food mix up against one wall of the tray. Place two new damp newspaper sections on top of the tray laying down on top of the bedding and food, replace the lid and you are ready to go.
Disasters and pests
We have had a few disasters over the 5 years I have been operating the unit.
The worst one was at the height of a very warm summer last July here in Anchorage. First warning was an unpleasant smell from the stack, something I only noticed once before when I harvested the dirt. A day or so later, I started seeing more worms on the floor around the unit than normal. When that got to be a LOT more, I cracked open the unit, removed the wet newspaper cap and took a look. Worms were clustered around the corners of the unit. The last portion of food I had added 4 days before was hot, dry and steaming. The worms were heading for the hills to escape the hot dry heat. I was essentially hot composting the food, a very bad thing in this unit.
I removed most of the steaming food and then mix it with the rest of the food in the tray to reset the temperature and do the best I could to gently brush the worms back into the unit. A few days later when I added the new week’s food, things had mostly calmed down. As I lost some unknown number of worms, I added another 1 — 2,000 worms to the top. What happened? I think I overfilled the top tray with dry food and packed it down a bit, driving it to hot composting mode.
The second disaster was a year ago during the Nov. 30, 2018 M 7.1 earthquake. A shelving system fell on top of the stack, bending the base. I had to replace the base to repair. We only had two pieces of furniture in the entire house that were not attached to the wall. Both fell down during that quake.
Another incident was that I harvested stinky compost from a tray about 18 months ago. My guess is that it was not well mixed when I added it.
When you add overripe fruits and vegetables, you also introduce insects and other animal eggs into the unit. I also had a mite infestation for a couple years. The worms generally avoid them, so the mites compost on the top level and the worms work underneath them.
Another time, we had a garage opener failure one afternoon that left the main door open for a few hours on a cold day. This didn’t freeze any pipes but did get the stack cold enough to kill off the mites and we haven’t seen them in a couple years.
Conclusions
Vermiculture is an interesting activity. Like everything else associated with gardening, it is a bit of a journey of discovery. I have come to enjoy it. As I said previously, this is just one way to do it, and might not even be the best one. But so far, it has worked well enough to keep doing it.
About Alex Gimarc
Twitter •
I would LOVE to do this, but I don’t have a garage. I’m in a tiny one-room house. I can get it going in the summer, but unfortunately can’t do it in winter….and that’s a perfect time to get compost ready for starts…like the writer said
I’ve heard of these being set up inside in utility rooms. There isn’t much of an odor from it and what I generally get is earthy. They are fairly clean other than the worms on occasional walkabout. The problem with one inside will be harvesting the compost and storing it over the course of the winter. Relatively easy in a garage; somewhat more interesting inside. One of the other things about having one of these inside is that I generally rinse off the inside of the cover once a week when I feed the unit. Also rinse off the stand and worm ladder when I harvest. Once again, a garage sink or a utility room sink would work. Probably wouldn’t want to do this in the kitchen sink (which may be a personal problem).
A final consideration is the amount of time it takes the food to compost. I find a 6-tray stack generally gives me 6 months to process. Shorter stacks will want to swap out quicker. For instance, a 4-tray stack might want to swap out in only 4 months which might not be enough time to process what’s in it completely. If you go this, remember that whatever goes into the top tray won’t come out for months.
Another option might be a drum system that you only use in the summer. No expert on that, though. Cheers –
I wonder if a crawl space would work? As long as it has easy access it might be warm enough and around the same temperature all year.