A Lesson Plan for Gardening in the Classroom in Alaska, by Cheryl Illg, An Alaska Master Gardener
Subject Area: Writing/Reading/Math
Grade Level: K-3
Ideal season for lesson: Spring
Time needed to facilitate lesson: 1 hour to plant seeds and make first observation. Then there will be several weeks of observation, measurements and documentation. The young surviving plants may then be transplanted outdoors into a garden or planter box to grow for the summer once there is no more chance of frost. Usually June 1st in the south and central parts of Alaska it is safe to plant starts outside.
 |
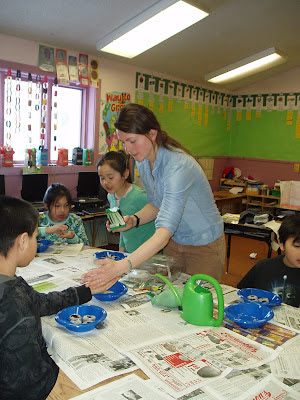
| Heidi Rader plants seeds in a classroom in Anvik. |
Note: The type of seeds and amount of light will determine the duration and success of the project. For example, radishes will germinate in 3-10 days and can be harvested in 20-30 days. Leaf lettuce likes partial shade and can be harvested in 35 days. Sunflowers will sprout in a week, and become small seedlings in two weeks, but will need something bigger than a yogurt cup! They will be 2 feet tall in a month. Nasturtiums will flower in 50 days, in a variety of colors.
Suggested materials: The Tiny Seed by Eric Carle, Yogurt cups with holes in bottom, rectangular plant flats/boxes to catch excess water, permanent markers to label each cup, seed starter soil, a small bin or bowl to hold soil, a small watering can or two, distilled water, paper towels. The type of seeds will determine how long this project is. While radishes grow fast, the little seeds may be difficult for the children unless the teacher buys seed tape. Larger seeds, like beans or peas are suggested so students may better see the seed and plant parts as they grow), black covers to keep out light or a dark closet, journals, pencils, ruler, magnifying glass(es). A sunny window is necessary or a grow light.
Goal and outcomes:
Grow 4 plants with varying conditions to observe what a plant needs to grow properly. Plant 1 will be given nutrient soil, water and kept moist, with adequate sunlight. Plant 2 will be given nutrient rich soil, water and kept moist, and covered to keep out light. Plant 3 will not be given soil only a paper towel, kept moist and given adequate sunlight. Plant 4 will be given nutrient rich soil, no water, and adequate sunlight. Students will document their observations 1-3 times a week and keep measurements of plant growth.
A Step-by-Step guide to teaching your lesson:
Step 1. Prepare seeds ahead of time by soaking overnight in a cup or ziplock bag with a damp paper towel. Follow instructions on the seed packet.
 |
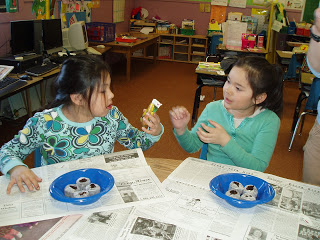
| Students in Anvik start seeds. Photo by Heidi Rader. |
Step 2. Read The Tiny Seed as a class and discuss what plants need to grow. Ask students why the seeds that landed in the hot desert, the ocean, and the cold mountain top did not grow? What was missing for the seed to grow? What do plants need to grow properly?
Planting:
Step 1. Place bin of seed starter soil, yogurt cups, seeds, paper towels, permanent markers, and small watering can at each table for groups of 4-5 students. Flats labeled Plant 1, Plant 2, Plant 3, Plant 4 maybe put off to the side for student to place their yogurt cups in once filled and planted.
Step 2. Depending on the numbers of students participating, you may choose to have students work in groups of 4 or give each student 4 cups and 4 seeds.
Step 3. Three of the four yogurt cups will contain seed starter soil, one cup will not have soil only a damp paper towel.
Step 4. Plant 1: Label cup with ‘Plant 1’ and student’s name. Place soil in the cup to the top, softly press soil down so there is a ½ – 1 inch space from the top. Have student press a ¼ inch deep hole in the center of the soil in cup with finger. Place seed in hole and lightly cover with soil. Water until water trickles or drips out the bottom. Place in flat.
Step 5. Place flat with Plant 1 plants in a south-facing window or under a grow light. Water regularly to keep moist.
 |
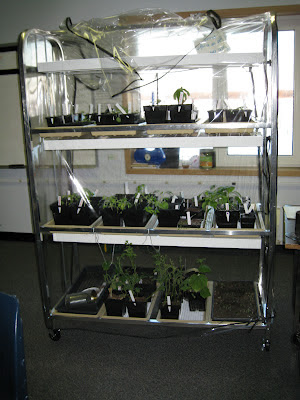
| This is in a classroom in Nulato, Alaska. Photo by Heidi Rader. |
Step 6. Plant 2 (no light): Label cup ‘Plant 2’ and student’s name. Place soil in the cup to the top, softly press soil down so there is a ½ – 1 inch space from the top. Have student press a ¼ deep hole in the center of the soil in cup with finger. Place seed in hole and lightly cover with soil. Water until water trickles or drips out the bottom. Place in flat.
Step 7. Place flat with Plant 2 plants in a dark closet or cover and place next to Plant 1 flat.
Step 8. Plant 3 (no nutrients): Label cup with ‘Plant 3’ and student’s name. Have students roll paper towel in cups in a cone shape and place in yogurt cup with point down to make a nest for the seeds. Place the seed in between the layers of paper towel so that it is surrounded on all sides. Water with distilled water until water trickles or drips out the bottom. Place in flat.
Step 9. Place Plant 3 flat in south facing window or under grow light next to flat with Plant 1 flat.
Step 10. Plant 4 (no water): Label cup with ‘Plant 4’ and student’s name. Place soil in the cup to the top, softly press soil down so there is a ½ – 1 inch space from the top. Have students press a ¼ deep hole in the center of the soil in cup with finger. Place seed in hole and lightly cover with soil. Water until water trickles or drips out the bottom. Place in flat. Do not water this plant again for the remainder of its growth.
Documentation:
Step 1. Journal: Students write their first observation the day seeds are planted. Write today’s date, an observation for each plant and a prediction for each plant. How will each plant grow? Which will survive?
Step 2. Students observe and document observations in journals 1-3 times week. Over the course of the activity, students may want to use magnifying glasses to look more closely at the plant details. At some points, ask students to draw Plant 1, 2, 3 and 4. Measure the height and largest leaf of each and write in journal. Students may want to measure the visible roots of Plant 3 as well. Write 2 descriptive sentences for each plant.
Step 3. As the plants’ growth begins to differ between the four groups, ask students questions related to the kinds of growth or lack there of that they are observing. What are the differences in growth measurements? What is the difference in color? What’s the general appearance of each group of plants? Why are Plant 2 plants pale green compared to Plant 1 plants? Why are Plant 4 plants drooping or leaves dry and brittle?
Curricular connections/extension activities for other subjects (correlated to GLEs when appropriate)
Grade 3 Science:
The student develops an understanding of the processes of science by:
[3] SA1.1 asking questions, predicting, observing, describing, measuring, classifying, making generalizations, inferring and communicating
[3] SA1.2 observing and describing the student’s own world to answer simple questions
The student will demonstrate an understanding of the attitudes and approaches to scientific inquiry by
[3] SA2.1 answering, “how do you know?’ questions with reasonable answers
The student demonstrates an understanding that interactions with the environment provide an opportunity for understanding scientific concepts by
[3] SA3.1 observing local conditions that determine which plants and/or animals survive (L)
Grade 2 Math:
The student demonstrates understanding of measurable attributes by:
[2] MEA-1 measuring to the nearest inch or foot (M2.1.3)
2] MEA-9 writing the date using words and numbers (day, month, year) (M2.1.1)
Grade 2 Reading:
The student comprehends literal or inferred meaning from text by:
[2] 1.2.1 Answering questions about information explicitly stated in text.
[2] 1.2.2 Self-monitoring comprehension by making predictions or formulating questions while reading (e.g., why is the wolf dressed in grandmother’s clothing, why are mother bears dangerous, what will happen next), or rereading (e.g., for clarification, confirmation, correction)
[2] 1.2.3 Making simple inferences
[2] 1.2.4 Drawing conclusions about stories and/or based on information presented in the text (e.g., cause and effect).
The student follows oral and written directions by
[2] 1.6.1 Following multi-step oral directions to complete a task
[2] 1.6.2 Following one- to two-step written directions to complete a task
The student analyzes content and structure of genres by
[2] 1.7.1 Distinguishing between fiction and non-fiction, poetry and prose
Bibliography
Carle, Eric. The Tiny Seed. New York: Simon & Schuster Children’s Publishing, 1998.
Fowler, Allan. From Seed to Plant Rookie Read About Science. Pennsylvania State University: Children’s Press, 2001.
Gibbons, Gail. From Seed to Plant. New York: Holiday House, 1991.
SAMPLE: Journal Entry 1
Date________________________
Plant 1
Observation:___________________________________________________________________________________________________________________________________________________________________________________
Prediction:_____________________________________________________________________________________________________________________________________________________________________________________
Plant 2
Observation:___________________________________________________________________________________________________________________________________________________________________________________
Prediction:_____________________________________________________________________________________________________________________________________________________________________________________
Plant 3
Observation:___________________________________________________________________________________________________________________________________________________________________________________
Prediction:_____________________________________________________________________________________________________________________________________________________________________________________
Plant 4
Observation:___________________________________________________________________________________________________________________________________________________________________________________
Prediction:_____________________________________________________________________________________________________________________________________________________________________________________
SAMPLE Journal Entry
Date_________________________________
Plant 1 Drawing height_________ leaf length_________
Plant 1 Observation________________________________________________________________________________________________________________________________________________________________________________
Plant 2 Drawing
height_________ leaf length_________
Plant 2 Observation____________________________________________________________________________________________________________________
Plant 3 Drawing
height_________ leaf length_________
Plant 3 Observation____________________________________________________________________________________________________________________
Plant 4 Drawing
height_________ leaf length_________
Plant 4 Observation____________________________________________________________________________________________________________________
About Heidi Rader
Twitter •